Saturday, December 14, 2013

Winter Hive Activity

Hello !

Sorry about the lack of activity as of late.

Today we are experiencing some reasonable temperatures - in the low 30's instead of single digits like last week.  I was very worried about that cold snap but I have taken precautions.

I usually wrap my hives with the large bubble wrap then finish with a black plastic or tar paper over wrap.  I have several hives in town this year and the large hive is the light-green hive and there are two single story colonies resting on top of this. 
Wrapped Hives

I am also using some leaf bags are extra insulation around the base of this hive.  There is also some pink foam board as well. 


I was working in the yard today when I noticed some of my bees coming out and moving around the small entrance.  One even took flight and quickly headed back in!


It was exciting to see them so active after the really cold weather we had last week.  They are pretty tough and my little bit of insulation must really help them.   


Here is a close up of the gals checking out the weather - outside of the hive.  They did not stay out for long!

Monday, October 7, 2013

Honey House Construction Project

Hello !

I have been working on this construction project for several years now, occasionally working on it as time and money would allow.  During this quiet time in the beekeeper's year I have decided to get after it before the winter sets in.
Installed double doors and house wrap

A good friend of mine  helped me install these double doors for the building.  Most of the components were acquired second hand so the costs were  pretty low on this.  Just time consuming.  I hope to finish the siding before we get the snow here next month.


The Russian Knapweed is still in bloom up here as well.  There was quite a bit of it around the area and beeyard.
Knapweed in the sun

Saturday, September 28, 2013

Feeding Trip to the Bee Yard

I use top feeders protected by what I call a 'feeding box'.  This box keeps the jar warm and it makes it possible to feed the hives without having to disturb them very much.  No opening the hives, no smoker and very FAST.  I took me about 5 minutes to feed these 5 hives.

Feeding Quart
The mixture is a 1:1 syrup mix with 8 to 10 drops of these essential oils:  Peppermint, Thyme and Lemongrass.  They LOVE this mixture and will eagerly eat this up unless there is a flow going that they would rather have.


3 Buckfast Colonies with wet supers on.
 These 3 had some 'wet supers' on from the last harvest to help them get a boost before the winter weather begins to set in.  They are all doing pretty well in this spot.

Inside the Feed Box


 Here is an inside view of the 'feeding box'.  I also use a screened vent hole to allow for air movement.   They have propolized it a bit.

Feeding Boxes with no top covers

I have filled each jar and left the top covers off so you can see how it looks.  It was fairly early so I had no 'flyers' or angry bees at all AND I was done in about 3 minutes or so.  Nice, quick and easy. 

Tuesday, September 24, 2013

Buckfast Queen Introductions and the Alfalfa Bloom

It has been some time since I last posted but that is due to the honey harvesting and many other things that come in the fall.  Beekeeping can get fairly frantic this time of year!

This yard was an excellent producer this year.  The 3 colonies on the left are new queen starts using Buckfast queens from Weaver Apiaries.  I thought I would take a chance with these, even though it is quite late in the year, because they have done so well at my other yard and the alfalfa bloom is on-going here. 
New Colonies Setup


Close up of the new colonies


Here is a close up of these new colonies.  Each of these had 3 frames of capped brood and quite a few nurse and worker bees.  I also placed two full frames of honey on the outside frame slot for them. The colonies on the far right was EXTREMELY angry and 'pissy'.  The would attack me fiercely after I smoked em and gave them a few sprays of syrup mix.  I'm hoping THAT trait will be replaced with the new queen!


Last Years Colonies

These three existing colonies did VERY well at this yard this year.  The hive on the far left was from a daughter queen that I setup from a very productive Russian cross queen that survived and produced for 3 winters!  The two others were very weak at then end of winter and I thought they would die.  The cluster was down to a softball size.  I almost merged the two.  I'm glad I didn't.  They each rebounded and ended up producing about 50 lbs of extra honey.  They have 'wet supers' on them now as a way to supplement their fall feeding and will be removed in a few weeks or so.  


Alfalfa Bloom is STILL on !
My decision to place the new queens replacements here was driven by the on-going bloom and idea that we are going to get a nice little 'mini fall nectar flow' in a week or so.  The farmer has not cut this field yet so I thought I would take advantage of it and give it a shot.  

I am feeding 1:1 syrup with my top feeders though.  I am using 10 drops of   Thyme, Peppermint and  Lemon Grass essential oils as a feed stimulant AND to help with mites.  I will do mite testing next week and plan for treating here fairly soon. 

Saturday, August 31, 2013

Final Summer Harvest

Today I made my 'mountain run' and pulled honey from 8 colonies and got 18 boxes off.  It was a beautiful warm clear day and tomorrow it is supposed to hit 95 degrees.  Perfect for extracting!
You can see that my truck was pretty heavy laden with all that honey!

Truck loaded


After I off loaded the honey, there were some drippings on the tool box that the bees wanted to clean up.  these were from my hives in town and perhaps some 'riders' from my mountain yards.  They are very tenacious and do not want to give up the honey easily!

Cleaning up

Wednesday, August 28, 2013

Harvesting Comb Honey

Several of my colonies were setup to make these and boy did they come out great!  Beautiful and heavy, these  frames were packed  tight. 
Comb Honey

Wednesday, August 7, 2013

Good Performance with the Buckfast Queens from Weaver Apiaries

Check this out !

I purchased 3 Buckfast Queens from Weaver Apiaries in Texas about 4 weeks ago and just look at that brood!  I was impressed and we are about to have another nectar flow due to some recent rains.  I am eager to document how these work throughout the fall and winter this  year.   
Good Brood Pattern !


Buckfast Queen with Capped Brood


Here is a close up with a view of the Buckfast Queen.  Sorry about the shadow!  I trying to hold the frame and take the picture at the same time!

Monday, August 5, 2013

Sharing some Comb Honey

I had some comb honey available and decided to share some with some young students.  They were very eager to eat and learn something new.  Nice combination.  The kids really enjoyed it!
Eager and Hungry Students !

Tuesday, July 30, 2013

On the way to my "home" beeyard

Check out this field!  I found this to be so beautiful that I just had to stop and take some pictures of it.

We are facing West with the flowers oriented south - south east.  This field was just amazing.  The colors were so intense and I have a better idea as to why Vincent Van Gogh was so fascinated by them.


Of course, I got a close up of these flowers when I noticed that there were 3 honey bees working it.  I appeared that they were gathering nectar only at this time.

Enjoy your day!


Monday, July 29, 2013

Amazing Russian Beekeepers!

Here in Spokane, WA we have a large and vibrant Russian and Ukrainian immigrant community.  I have noticed that many of these folks are avid and skilled beekeepers.  I have picked up some good ideas from my Russian friends and they have been always helpful and kind with me and my questions!

Also - I notice that many visitors on my blog  here are from the Russian Federation.  Thank you for visiting!

 Спасибо, что посетили мой блог, и я уважаю ваши навыки в пчеловодстве!
 
I found this relevant video on Youtube and I was amazed! by these Russian beekeepers!  I can speak a little Russian, and I could make out some of what they guy was talking about.  The speaker is working his beeyard and adding some supers, harvesting propolis and talking about the growth of this colonies.  Very impressive!

http://www.youtube.com/watch?v=3HipomxmsJk

Sunday, July 28, 2013

Several species enjoying some honey drippings!

A few days ago we harvested our spring honey and is the usual case we had some waste drippings.  Amazing how honey seems to get EVERYWHERE during harvest.

I captured a moment with two species eating up this mess in our home yard.  Look at those wing sizes!  Amazing that the bumble bee can fly although they seem to crash into things when they do!


Wednesday, July 17, 2013

High Productivity

This frame shows some excellent characteristics of a strong colony.  This hive had most of the deep frames looking like this one.  Note the brood in the center and honey/pollen at the edges.  This was a very nice sight on a beautiful day.

Tuesday, July 16, 2013

Saving my back !

This post deals with some "re-engineering" of an old wheel barrow.  I got the idea from Dr. Miller, who was an amazing American beekeeper in the last century.  As you can see I removed the metal part of the wheel barrow which was rusted anyway and replaced it with some wood cross beams.  It works great !

As it stands I can move 150 lbs of honey frames with ease and this should make harvest a bit easier.

More to come!

Honey Super Wheel Barrow

Saturday, July 6, 2013

Visit to the Home Yard

Today I went up to the main yard to inspect and work my hives.  The weather was a bit warm and very sunny.  The mountain bloom is on!  The mock orange was especially fragrant.

Here is a picture of a busy hive up close:


The were very active with the bloom and didn't seem to care that I was even there.

Here is a picture of the mock orange:

Monday, July 1, 2013

More work on the Top Bars

I'm finishing up these two hives this week and hope to add Bees by next week or so.

The 2X4 stands are from scrap lumber - as is the 1" lumber for the main body of the hive.

Enjoy !
On the deck

They need some top bars !

Saturday, June 22, 2013

Top Bar Stand and a Swarm Catch !

Hey !

We had some excitement today.  First, I was spending some great time in my shop constructing some new top bar hive components.  I built a very sturdy platform for them and some follower boards that act as feeding ports.  Let's take a look at the stand first.

Simple Stand with 2X4s

These simple follow the 30 degree cut at the base to match the shape of the hive body.  The two 2X4s offer lateral support. These are 28 inches high.


Hive Body Secure and Level


Now you see the top bar hive body resting securely on its stand.  Rock solid and its about 35 inches tall.  Very easy height to work with.


Follower board Feeder Port

Here is my idea for a follower board that acts as a feeding port at the same time!
Just add some feet to the bottom of the follower board with the correct spacing for your feeder.  I use a simple 'floor' that the feeder sits on cut with the same 30 degree s sides so that it fits snugly in the hive body.


SWARM CATCH !


Later in the afternoon - one of my hives decided that it was time to swarm.   This was a total surprise.  However, I was ready to retrieve it.
I improvised a simple swarm catch net with a pillow case and a wire hanger on the end of a long wooden stick.
Swarm Catcher Net

Then I fixed on the wire using some duct tape.  Great stuff.


Nothing by Net !


This is me catching the main ball of bees to drop them into my swarm box.


The new 'temporary' home


It took a few hours, by they all marched into their new home.  Tomorrow I will take them up to the main yard.

Wednesday, June 19, 2013

Top Bar Hive Construction

Top Bar Hive Construction

Hello Everyone !

My wife thinks I'm kindofa scrounge/wood hoarder.  Well, I guess I am in some ways.

I occasionally find some pretty good/clean 3/4 to 1 inch pine that has been thrown away.  As you can see I 'glue lammed' these together for the side walls of my Top Bar hives.
Glue Lammed 1 by 5.25 inches or so

These measure about 10.3/4 inches by 40 inches long.  There is an angle cut of 30 degrees on each end.  This makes a parallelogram of each side wall.


End Wall Construction


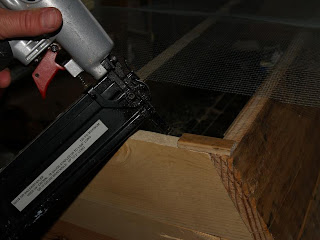
Since our cuts are at 30 degrees - you can set your chop or radial arm saw to cut the end walls.  This piece needs to be flush with the side wall.  I used my pin nail shooter to gently 'tack it' into place.  Repeat for both ends.  You will need to piece in the bottom piece to enclose the box.


Both Walls are now attached

Here you can see how I attached the other wall.  Once I get everything pieced together I will  use a 2 inch staple gun (with a 1/2 inch crown) to secure the box together for good!


I am a big fan of using a Varroa Screen as I believe it  helps with these pests and the screen has the added benefit of keeping the hive ventilated during the warm summer months.  A nice and dry hive is a happy hive!  In the winter, I will close this from the bottom to prevent drafts.
Making the screen standoffs for the entrance

Here I used a 3/8ths  by 2 inch standoff for the screen.  I pinned it with my nail gun.


Ready to attach screen


Attaching Screen

By using the staple gun I can secure on end and gently pull the screen from the opposite side to make it nice and tight.


Landing Platform Cleat

I attached a cleat to the bottom of this hive   to better secure the screen, and to create a landing place for the bees to enter.  Once the season progresses, I have made some additional entrances.


I will have more later !


Friday, June 7, 2013

A visit to another Outyard 6-7-13

Outyard Visit:  6-7-13


Today I headed up north to check on my two outyards.  They were doing fine.   A few colonies were really growing!

Pretty nice view eh?
Beautiful Site


On the center hive I made an observation window so you could peek inside and see whats going on without disturbing them.

Back side view
Close up looking inside


In the little field where I keep the bees, there is a black gelding that is very curious about my presence there.  I noticed that he has eaten the grass all around the hives EXCEPT for the very front. Gee, I wonder why ?

Talk you you later!

Wednesday, June 5, 2013

Hiving a honeybee swarm

Hiving a swarm:  6-4-2013

This video shows how I captured and saved a honey bee swarm.  The swarm was in the soffit of a very nice home just northwest of town.  The owners were very kind and did not wish to harm the swarm but they wanted it to find another home.  

I use a temporary 'swarm box' that is a simple 8 frame box with a floor secured to the box.   It has just one entrance with a hinged lid and closes easily after you dump the bees in.  I also put in 3 frames for the bees to climb on.  One was fully drawn, the other two were just some foundation.  Most of the box is empty and this allows for room for the 'ball of bees' to fall into the box.  

I gently remove the ball of bees from the house and dump them in.   The queen is usually in the middle of the ball.  I then close the lid and move away, coming back later (usually near nightfall) and plugging the entrance and taking them home.

The next day, I setup their new hive with additional frames and move them into the the box with the proper amount of frames.  I then put on a top feeder with 1:1 syrup and some essential oils (peppermint, lemongrass and thyme)  about 10 drops for each in a quart jar.  


Thanks !


A visit to an out yard


Hello Everyone !

I performed a quick check of one of my out yards yesterday as well.  The weather is improving quite a bit and the hives are busy.  One of these has 3 supers on it already and the top box is about to be capped.   Amazing.

Tuesday, June 4, 2013

FIRST SWARM 2013


Hello Everyone !

I have capture my first swarm of the year.  It was pretty high - under a soffit in a fairly expensive home.  I removed the first 3 panels to reveal this:

It was a medium sized swarm that had settled here for the past 3 or 4 days.  It was building comb as you can see in this next picture


You can see the white comb directly under t he cable wire.  I was about 15 feet off the ground at this point, however the ladder was very steady and I was perfectly safe.

I transferred the ball of the bees - wax and all into a transfer box with a few frames and scented with the swarm lure.  There was one frame of honey too .  I will go back in the evening to collect the transfer box once the bees have settled into the box for the night.

Sunday, June 2, 2013

Top Bar Hive Inspected


We had some heavy rain early this morning but the sun came out and so did the Bees!

I inspected the top bar hive to make sure it was progressing along and to introduce some new frames with wax 'starter strips' for them to build on.  This hive is doing very well.
Starter Strips