Saturday, March 30, 2013

Setting up an outyard

Today I moved some colonies to a new yard.  A good friend of mine owns some property in southern Stevens county that is surrounded by orchards, sunflower fields and some great snow berry and Hawthorne 

This is what they looked like when I loaded them into my truck
Notice the ratchet straps holding the inner covers down on the supers.  I learned about this the 'hard way'.  I was transporting colonies a few years back when them unsecured.  Much to my surprise, I had a few escapees at a red light in town!  The road vibration caused them to shift in transit.

I learned my lesson.  Now each hive is secure using these straps and this makes everything 'bee tight' for trips to the outyards.


Now these 5 colonies are safely installed on a couple of pallets.  I have bubble wrapped the back side plus a folded tarp on top.  It is nice today but that situation may not last long!

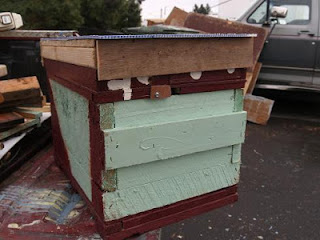
The hives are pushed together for mutual warmth.  Now, with them so close I felt I might suffer from some drift - so I have painted each colony brood chamber with distinctive color.  I'm hoping they will 'bond' better with their specific homes.

Note the blackened super on top of the brood chamber and inner cover.  This is used to protect the syrup jar inside.  The black paint causes the temperature to rise quickly in the direct sun.  This, in turn,  warms up the syrup and encourages feeding.

I am excited about the prospects for this yard.  Should work very well.

- Have a wonderful Easter Sunday!

Friday, March 29, 2013

100 % Percent Survival up at my main bee yard!

I was absolutely thrilled by finding that ALL of my colonies - with the raised Queens that I reared last year - survived the winter and are thriving there.

Here is what my place looked like:

They were very busy and collecting massive amounts of yellow pollen.  This me a sign that they are brooding quite a bit.

Thursday, March 28, 2013

Happy Hived Nucleus Colonies!


Yesterday, I hived the starter colonies that I retrieved from California.  Some were very strong and a few were pretty weak.  I'm hoping with the right care and management they will bounce back.  For now, they are very happy indeed - taking up syrup with my 'special mix' that I will share later on. 

Happy Beekeeping !

Wednesday, March 27, 2013

Another weapon against the Varroa Mite


I made this simple powder sugar shaker today and used it when I hived my nucleus / starter hives.  Use a plastic container so you can squeeze it to apply the sugar.  The lid has some holes and I cut to fit some screen to prevent too much of the power from coming out with use.  A 2 lbs bag of sugar was used to hive about 20 nucs. 

I feel this technique has three main benefits:

1.  Upon opening the nuc box, gently puff some cool smoke over the bees.  Then powder the top of the frames initially.  This seems to calm down these gals as they are  VERY angry at this point!  They start eating immediately and therefore are distracted a bit. 

2.  Pull each frame out calmly and carefully and dust  it down on both sides with the powder sugar.   Again, they seem very interesting in eating and are distracted.  They will look like little ghosts!  You can see them start cleaning and grooming each other.  Hopefully, this will mean that they will clean off the mites!  Plus, this feeding will help them get them a little boost for their first nights in some cooler weather up here in Spokane. 

3.  Their new home has a screen bottom board so the sugar will disrupt the varroa mite as it tries to move from one bee to another.  The powder causes them to lose their grip and fall through the screen. 

This treatment cost just a few dollars and some time while hiving.  I think it will be helpful and a second treatment will be done in two weeks to disrupt the varroa reproductive cycle. 

Give this low cost and natural method a try!  Let me know what you find out

Thanks.... Happy Hiving!

Tuesday, March 26, 2013

Starter Colonies Picked Up 

Made it back from California on a 'bee business' trip. Amazing warm weather, great to see family and bring back the colonies to get started here.

Wednesday, March 20, 2013

Life in the Bee yard - 2013


The audio is a bit bad...and my apologies to Johann Pachelbel for my attempt to play his beautiful piece of music.  Enjoy

Spring 2013

Staged Equipment - Getting ready for Nucleus Hives (Starter Colonies) next week !


After a month of construction and assembly, I am increasing the size of my Apiary this spring.  I am going to use 8 frame equipment from now on.  Picking up a 10 frame deep, that is full of bees, brood and honey, is getting to be a real chore.  Also, I am planning on using two Top Bar hives this year as an experiment.  The Cut Comb honey market is under served so this might be a good way to go. Happy first day of Spring!

Sunday, March 17, 2013

Observation Hive Super - Made Easy !


Here is a deep super slightly modified with a view port.  I found a piece of plexiglass in a construction dump pile that was cut to fit.  Ran the router and nailed a cleat to hold it in place.  A rabbited strip acts a guide for the sliding door. 

Now, I can occasionally take a peek and see what's going on.


I will post pictures of the busy gals as soon as I can!

Have a great day!

Thursday, March 7, 2013

Wow... even the bees love caffeine !


I love a good cup in the morning.  Turns out that the bees love it too!

Check out this fun article:
http://www.npr.org/blogs/thesalt/2013/03/07/173465469/if-caffeine-can-boost-the-memory-of-bees-can-it-help-us-too

Wednesday, March 6, 2013

Top covers made easy!


A top cover or weather cover serves two purposes for a honey bee hive. It provides a way of keeping the entire hive dry by shedding water away from the kit. The second purpose is to insulate the hive to slow down nightly heat loss from the colony. As the weather warms up in the summer, you can tip up the top cover cover to allow air flow from the screened inner cover to move up through the hive. This ventilation is critical to keeping the hive cool and comfortable for your bees. Comfortable bees are productive bees. We all want that!

The first picture shows a simple piece of OSB scrap that I have trimmed with my table saw to fit my 8 frame equipment. Roughly 14 inches by 20 inches.


I find 2X4 scraps everywhere, so the price is right. Simply cut these to fit around the perimeter of the OSB sheet.


Turn the sheet over and place your 2X4 blocks where they are supposed to fit. Nail em with your air stapler gun. I use 2 inch stables that have a ½ inch crown. These work the best for me.


The top cover has a piece of corrugated plastic that was a political road sign. With this year's election, there was quit a bit of this to be found. What a mess. I simply clean it up by collecting these after the election and ripped them on my saw to fit my equipment. Water proof and a bit insulating, these were a great no-cost part of this construction!


Using roofing or siding nails (with a big nail head) simply nail the plastic cover to the wood frame to protect it. Now it is ready to paint and be deployed. It is pretty heavy and will not blow off in a strong wind. It weighs about 4 lbs as it is but you could put a brick or heavy rock on top if you get gale force winds in your yard.


The cover 'telescopes' on only two sides. This way, I can push my hives together in the early spring to help them warm each other. If it was fully 'telescoping' there would be air gaps between the hives and would not be helpful in the winter or early spring. 

Cheap and easy to build. Hive equipment doesn't need to cost a fortune.  Just a bit of your time, tools and technique, anyone can make this kit in very little time.  Next week - an observation hive built for student viewing!